Learn to Build a Stone Wall
By Tutorials.com
January 15,
2008
 Learn2 Build a Dry Stone Wall Courtesy of:
|
Need wall ideas? Check out landscape design magazines, or
stonework brochures from the supplier. Just stay clear of overly complex
designs that need professional skills to assemble. For a little extra, you can sometimes buy stone with
lichen or moss already growing on it, for that pre-aged look. If you want to use stone gathered from your own property,
be aware that you might need more than what you have available (and that, as
a rule of thumb, you'll always need more than you think you will). Consider
taking a sample to a supplier to make sure it can be matched, if necessary. Have the stone and aggregate placed as close to the
working area as possible, without, of course, blocking the wall's placement. If you're building a long wall, you may want to have the
aggregate dumped in multiple piles along the planned course for easier
access. If your aggregate pile isn't easily accessible, a good way
to transport it to the wall is with a wheelbarrow or large buckets (10-gallon
drywall buckets work well). Just fill them at the pile, carry them to the
wall, and pour them in. When laying out the base stones, let them drop from your
hand from about 6 inches (15.2 centimeters) above the aggregate--this will
"seat" them, tamping down the base further for added stability. Use
this technique when setting the rest of the stone as well, so the wall
settles as you go. To create chink stone, place a larger stone on the ground
and break it into pieces with your sledgehammer. Always use protective
glasses when doing this, and try to use stone that isn't useful in its
current form. If the top of a set stone doesn't cant enough toward the
wall's center, don't worry. You can lay chink stone on the top to make the
next stacked stone cant correctly. You can shape a stone by chipping off its thinner edges.
Hit it hard with your brick hammer's sharp end until you have a score line
around the area you want to break off. If the piece doesn't break, keeping
hitting along the score. Don't expect a perfect break every time. As you build your courses, alternate the placement of the
cornerstones. For example, if one cornerstone ties the side, on the next
course, set in two or three cornerstones that run perpendicular to it. Try to set tie stones in your courses about every 4 feet
(1 meter). If you want to adjust a stone that's already set, push the
flat edge of your crowbar underneath the stone and use the stone beneath it
for leverage. You'll be able to move it much more easily than if you use your
hands. Cut a 1 by 2-inch (2.5 by 5-centimeter) board to the height
you want your wall, so you have an easy reference check as you build. To check the wall's cant, hold the reference board with
one end resting on the ground and touching the bottom edge of the base stone.
Hold your level against one side of the board to make sure it's perpendicular
to the ground, and then use your measuring tape to check the distance from
the board to the wall's face. If you want a level top to your wall, plant stakes firmly
at each end of the wall before you reach the last course, and then tie a
string between the stakes as high as the wall's projected height. Hold your
level up to the string, adjusting it until its level. Once it is, build the
remaining course and capstones up to the string. To calculate the amount of aggregate you'll need as
backfill, multiply the height of the wall with its length, then multiply this
with the rough distance between the top of the wall and the point where the
embankment begins to slope. Divide this figure by two. Even with only one exterior side, a retaining wall still
needs tie stones. Lay them regularly so one end enters the backfill. This
will anchor and strengthen the wall. Tamp down the backfill aggregate as you build so the wall
is regularly settled. If you're building at the bottom of a long slope or hill,
the runoff (the water that moves through the ground) could be significant
enough to require a drainage perimeter pipe, available at hardware and
landscape supply stores. Lay the pipe against the back of the base stones, on
top of the drainage layer of aggregate, then backfill aggregate over it as
you build. Follow the package directions regarding fitting and sloping the
pipe. http://www.tutorials.com/07/0741/07411.asp |
Your very own bouldered bastion of bulwarked beauty Built by carefully stacking stones without using mortar, a
dry stone wall can give an everyday landscape a timeless air, and with good
reason. This type of work is one of the oldest trades in history. If you're
interested in creating a wall for your own yard, be it for aesthetics or
function (such as a retaining wall), we'll take you through the materials,
tools, and techniques of this ancient art form. They don't measure stone in tons for nothing. Keep your
project within a manageable scale and treat your materials with respect.
Always wear heavy-duty work gloves and work boots (steel-toed are the
safest). If you're chipping or breaking stone, wear protective glasses. If
you have any physical problems, try to work with a partner in case you need
help. And finally, if you're feeling tired, take a break--fatigue and
stonework don't mix. Note: Be aware of building codes and property laws. If you live in an area
that's prone to earthquakes, codes may prohibit this type of wall. If you're
building to mark your property line, avoid misunderstandings by consulting
your neighbors beforehand. Design the wall The more effort you put into planning, the less likely
you'll be to run into unexpected problems when you build. As you start
plotting out your wall, keep three things in mind: Scope. As mentioned previously, you don't want to get in over your head.
Even if you have a grand plan for your wall, start small. It's best to build
no more than 60 cubic feet (18.3 cubic meters) at a time. For example, a wall
that's 2.5 feet high, 1.5 feet wide, and 15 feet long (.76 by .45 by 4.5
meters) is about 56 cubic feet. Staying in this range should give you a good
feel for the physical and technical demands of stonework, without too much
strain. And remember, you can always add more later
if you want. Fit. A good design complements its surroundings, so try to picture the
finished wall within its planned setting. Will a soft curve work best, or a more regimented straight line? A low wall, or one that's slightly higher? Consider your present
landscaping style: A more meandering garden might fit well with
rougher-looking stone, while for a carefully manicured yard,
you'll probably want a cleaner, more formal design. Also, don't forget that
stone can come in a variety of colors--consider what shade will balance with
the house and landscape. Stone. The best way to decide on stone is to go to your local supplier
(check under "landscape supply" or "stone" in the phone
book), describe your project and the "look" you want, and see what
they recommend (and what they have in stock). The most commonly used wall stone
is faceted, that is, with easy-to-stack, squared-off faces--key for a solid
construction. There are many varieties of faceted stone, with differences in
color, shape, texture, and price. Other wall choices include river rock, rounded stones that
you should probably avoid, since you'll need a very wide base to stack them
safely, and flat stone, rock such as shale or slate that comes in thin slabs.
Flat stone can make fine drystack walls, but it
usually costs significantly more, since its smooth surfaces are better suited
for more polished work. Whatever your decision, remember that your wall will only
be as good as its materials, so go with quality. Cheaper, more roughly shaped
stone may seem like a good buy (after all, a rock's a rock, right?), but it
can add a lot of difficulty to the construction while subtracting from
overall aesthetics. Calculate your
materials Once you've chosen your stone, it's time to put on your
math cap and figure out just how much stone and filler you'll need. Here's
how:
If you're wondering why you'd need the full amount of cubic
feet in stone, in addition to half in filler, the reasons are stability,
selection, and security. First, you'll need a little extra aggregate for the
base layer below the wall. Some extra stone will give you more sizes and
shapes to choose from, which is crucial to a well-built wall. And finally,
remember it's better to have too much than too little. Gather and sort
your materials When you're ready to order your materials, be sure to tell
the supplier what size aggregate you want (3/4 of an inch, or 1.9
centimeters, is best--big enough to not slip through the joints, but small
enough to shovel easily). For the stone, you'll want a variety of sizes.
Expect a rough mix of these five shapes: ·
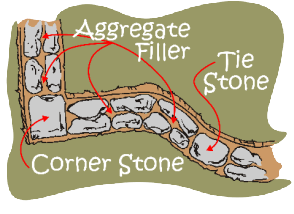
Cornerstones: Large stones with 90-degree angles that you can use for wall corners ·
Capstones:
Large, flat stones that "cap" the top course of the wall ·
Tie stones:
Long stones that lay across the full width of the wall, "tying" the
two sides together for added security ·
Base stones:
Large, stable stones used for the first course ·
And finally, mixed grade, which includes everything in between Unless you want to pick up the stone yourself, the
supplier will deliver it (usually for an added charge). Stone typically comes
on pallets so they can be placed wherever you want. The aggregate will
usually be delivered in a dump truck and deposited in a pile. Once the stone is delivered, it's up to you to unload it
from the pallets. As you do, try to sort it by the shapes listed previously.
This way, you won't waste time searching for the right size when you start
building. Dig and line the base The stability of your wall will largely depend on its
base, so here are the steps to setting it up correctly: ·
Mark off the base's dimensions (width and length) by tapping wooden
stakes into the ground at each of the wall's corners, then tie string lines
between the stakes and close to the ground. Note: If your wall is
curved, you can mark the edge by tapping in evenly spaced stakes along the
curve, then connecting them with string. Or try laying out a garden hose
along the edge--this will give you a smooth curve every time. ·
Within the dimensions, dig a 4-inch (10-centimeter) deep trench if the
wall is shorter than 1.5 feet (.5 meters). If it's higher than that, dig the
trench 8 inches (20.3 centimeters) deep. Remove any roots or rocks so you
have a level trench bottom. ·
For a shorter wall, line the trench with two inches (5 centimeters) of
aggregate. For a taller one, line it with a 4-inch (10-centimeter) layer of
aggregate. ·
Tamp down the layer. You can do this using a commercial hand tamper,
but laying a board over the layer and jumping on it a few times works just as
well. With the recessed trench providing snug security for your
first course, and the aggregate allowing for proper water drainage, you're
ready to start building. Lay the base
stones As you start your stone-laying extravaganza, don't forget
to stretch those muscles first, lift with your legs, not your back, and keep
these guidelines in mind: ·
Start at one end of the wall, laying the cornerstone in the trench
first. If possible, try to find a cornerstone that "ties" the
corner--that is, lays across the full width of the
wall. ·
Lay down the base stones, one after the other, by butting them
together in two parallel rows on either side of the wall. Leave space between
the rows where aggregate filler will go. Try to lay a tie stone every yard or
so for strength.
·
When you pick the base stones, don't worry if they match in height.
The most important criterion is that each stone has two fairly flat
faces--one to sit on the aggregate drainage layer (usually the larger face),
and one to point out from the wall (hopefully, the better-looking face). For
the top face (onto which the next course will be laid), the one key
requirement is that it doesn't slant away from the wall's center. If
anything, it should slant toward the center, since you want your successive
courses to "cant," or slope slightly inward. This allows the wall
to stabilize itself. ·
Stone walls look best when the joints (the spaces between the butted
stones) are tight and complement each other, so try to pick base stones that
will butt together in this way. If you can't find a good match, don't worry.
You can always add "chink" stone--small, broken pieces of larger
stone used to fill in larger joint gaps, or to help correctly cant the stone. ·
Once you've finished laying the base stone (with another nice
cornerstone or two at the opposite end), shovel in the aggregate filler,
enough so it crests the tops of the shorter stones. As you build, you'll notice that laying wall stone is a
little like solving a giant puzzle. What you put in early on can have a big
effect on what you set on top of it later, so don't rush the work. Build the
courses In masonry, a course is a continuous, level layer of
stone, which, when stacked on top of other courses, forms a wall. However,
since typical wall stone isn't uniform in size (like brick), a drystack course won't be one level layer of stones, but a
mix of sizes and shapes fitted together into one roughly level layer of
stones (onto which you build the next course). To get started, follow these
guidelines:
Placement. With the exception of laying the
base stones, build each course by starting on either end of the wall and
regularly alternating between the two ends until the two sides meet in the
center and the course is completed. This will help tie the wall together. Height. Each course's height depends mainly on the size of the
stone you use for it. For example, to create a level course with the base
stones, you need to stack on top of the shorter ones to square them up with
the taller ones; thus, the taller stones determine the height of that course.
(Courses typically range from 6 to 12 inches, or 15.3 to 30.5 centimeters.) Levelness. Remember: roughly level. With the course layer's crest,
you mainly want to provide a stable shelf for the next course, and ultimately
the capstones. If the layer wanders up and down a little, that's fine
(although for the last course, you'll want a fairly level base for the
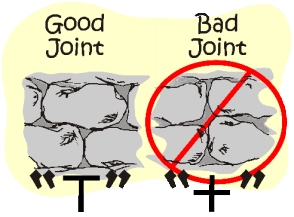
capstones). Joints. When you start a new course (or stack rock within a
course) always cover the open joints of the butted stones below it. It's a
good policy to have no more than three stones coming together vertically
(usually in a T-shaped joint). Too many vertical joints (four stones or more,
forming a cross) can weaken the wall's integrity.
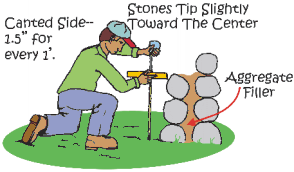
Canting. This is absolutely critical to the wall's strength. The
rule of thumb is to cant each side toward the center 1.5 inches for every
foot (3.8 centimeters for every 30.5 centimeters) on either side. Measure
regularly as you build the wall up.
Filler. Continue to add your aggregate filler as you lay your
stone. By keeping the filler level crested with your building height, you
provide constant stability and backing to the stones. Remember that the
aggregate can help form the shelf onto which you stack your next course. Facing. Don't forget about looks. Keep your joints tight and
complementary, using chink stone when needed, and try to orient the stone's
best face forward, with its edges as flush as possible with the surrounding
stone. Alternate shapes, sizes, and placement. Just remember to save enough
of the special stone (such as cap, tie, or cornerstones) for their particular
areas. Once you develop a rhythm for the work and a feel for the
stone, you'll be surprised at how involving an activity this is. Mind and
muscle combine, and piece by piece your vision becomes reality--a very
satisfying process from start to finish. Build a
retaining wall (optional) With a few tweaks to the design, a dry stone wall can turn
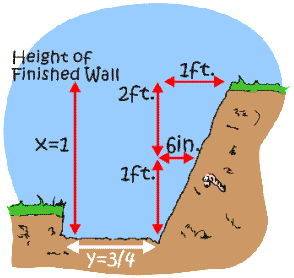
into a functional (and beautiful) retaining wall. Here's how it's done: Dig a drainage area. Since the wall will have soil behind one side,
it'll be in contact with a lot more moisture. This means you'll need to
provide a drainage area behind and below the wall. To start, mark off the
wall's base and dig a trench, with the width equaling three-quarters of the
wall's height. The trench's back edge should run along the soil embankment.
Next, if the embankment isn't naturally sloped, you'll need to dig out enough
soil, starting at the back edge of the trench, to create an incline that's
about 6 inches for every foot of height (15 centimeters for every 30.5
centimeters).
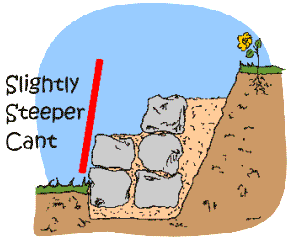
Build and fill. Line the trench with aggregate, tamp it, lay in your base stones and start building your courses.
Since you'll only be building one face, backfill aggregate between the stone
and the soil slope as you create the courses. Use the same construction
techniques explained earlier, with the exception of canting. Here, you want a
slightly steeper cant, about 2.5 inches for every foot (6.3 centimeters for
every 30.5 centimeters), since the wall will be supporting more weight. Angle
the stones toward the slope when you seat them in the wall.
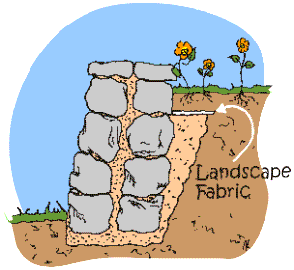
Cap the wall. You can either build right up to the embankment level,
with the aggregate backfilled behind it and showing on the surface, or, for a
more natural finish, you can cover the aggregate with soil to grow plants
right up to the wall's edge. To do this, stop building and backfilling when the wall is
about 8 inches (20.3 centimeters) from the top of the soil slope. Lay down a
length of landscape fabric over the top of the aggregate (this will allow
water to pass through, but not soil), then continue building the wall.
Backfill over the fabric with soil. Whatever method you choose, the wall
should reach about 4 inches (10 centimeters) above the backfill when
finished.
Remember, retaining walls aren't just for battling
erosion. They also work well for creating gardening terraces, planting beds,
or just for pure aesthetics. - end - This
article is courtesy of tutorials.com and is their sole property.
Please observe their copyright.
©2005 Learn.com Inc. All contents of this article are: Copyright © 1996 -2004 Learn2
corporation and/or its suppliers. All rights reserved. Learn2, The Ability
Utility, Learnlets, 2torials, Learn2 TV, The New
Way to Learn, Panmedia and other marks for Learn2
corporation's products and/or services referenced herein are trademarks or
registered trademarks of Learn2 corporation other product and company names
mentioned herein may be the trademarks of their respective owners.
|